How to Run Linux Commands on Windows 10
Can I run Linux commands on Windows? Cygwin is too heavy, Git for Windows is too light, freeware MSYS2 is a better choice
Free Download (Windows XP above)
Download msys2-x86_64-YYYYMMDD.exe version if you have 64 bit Computer, otherwise select msys2-i686-YYYYMMDD.exe
I installed it on Windows 10, so I chose the x86_64 version
After downloading, I will set up the mirror site of MSYS2 in C:\msys64\etc\pacman.d directory because there are mirrors of MSYS2 near my location, you can usually skip this step
Install MSYS2 following the guide at the download page
For the 64 bit version, the default location of the MSYS2 installation is C:\msys64
Basic usage of pacman (package manager for MSYS2)
Generally, Linux commands have some operations and options, each operation/option has a shorter version and a longer version
pacman -Syu, S is a shorter versions of a operation, y and u are shorter versions of two options. When you first saw it, did you know what it meant? Bad for beginners!
The best tutorial is that no tutorial is needed, the command with the same effect but a longer version is pacman --sync --refresh --sysupgrade we can directly guess what it means
Tutorials on the web should always show the long version of commands/operations, while one can still use the short version at home
-
Help for pacman:
$ pacman --help usage: pacman <operation> [...] operations: pacman {-h --help} pacman {-V --version} pacman {-D --database} <options> <package(s)> pacman {-F --files} [options] [package(s)] pacman {-Q --query} [options] [package(s)] pacman {-R --remove} [options] <package(s)> pacman {-S --sync} [options] [package(s)] pacman {-T --deptest} [options] [package(s)] pacman {-U --upgrade} [options] <file(s)> use 'pacman {-h --help}' with an operation for available options -
Help for
--syncoperation:$ pacman --help --sync usage: pacman {-S --sync} [options] [package(s)] options: -b, --dbpath <path> set an alternate database location -c, --clean remove old packages from cache directory (-cc for all) -d, --nodeps skip dependency version checks (-dd to skip all checks) -g, --groups view all members of a package group (-gg to view all groups and members) -i, --info view package information (-ii for extended information) -l, --list <repo> view a list of packages in a repo -p, --print print the targets instead of performing the operation -q, --quiet show less information for query and search -r, --root <path> set an alternate installation root -s, --search <regex> search remote repositories for matching strings -u, --sysupgrade upgrade installed packages (-uu enables downgrades) -v, --verbose be verbose -w, --downloadonly download packages but do not install/upgrade anything -y, --refresh download fresh package databases from the server (-yy to force a refresh even if up to date) --arch <arch> set an alternate architecture --asdeps install packages as non-explicitly installed --asexplicit install packages as explicitly installed --assume-installed <package=version> add a virtual package to satisfy dependencies --cachedir <dir> set an alternate package cache location --color <when> colorize the output --config <path> set an alternate configuration file --confirm always ask for confirmation --dbonly only modify database entries, not package files --debug display debug messages --disable-download-timeout use relaxed timeouts for download --gpgdir <path> set an alternate home directory for GnuPG --hookdir <dir> set an alternate hook location --ignore <pkg> ignore a package upgrade (can be used more than once) --ignoregroup <grp> ignore a group upgrade (can be used more than once) --logfile <path> set an alternate log file --needed do not reinstall up to date packages --noconfirm do not ask for any confirmation --noprogressbar do not show a progress bar when downloading files --noscriptlet do not execute the install scriptlet if one exists --overwrite <path> overwrite conflicting files (can be used more than once) --print-format <string> specify how the targets should be printed --sysroot operate on a mounted guest system (root-only)
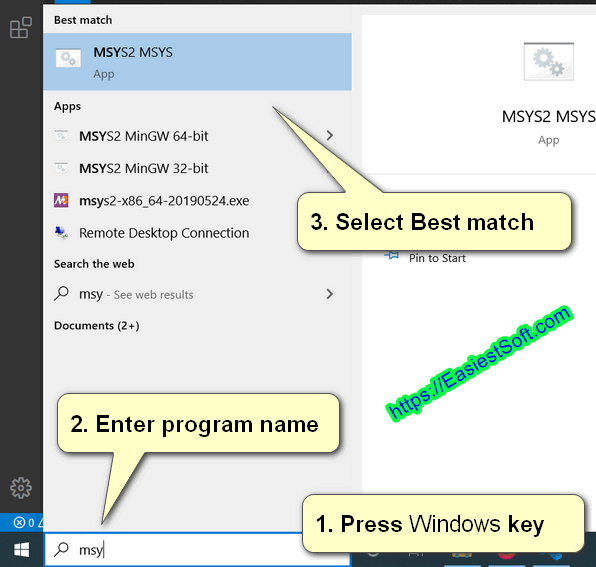
How to start a program on Windows 10
- Press the
Windowskey - Then enter the program name you are searching for, here is
msys - Press the up or down arrow key to select the best match (if needed), press
Enterto start the selected program
Install new software via package manager pacman
After starting MSYS2, enter the command:
pacman --sync tar openssh unzip

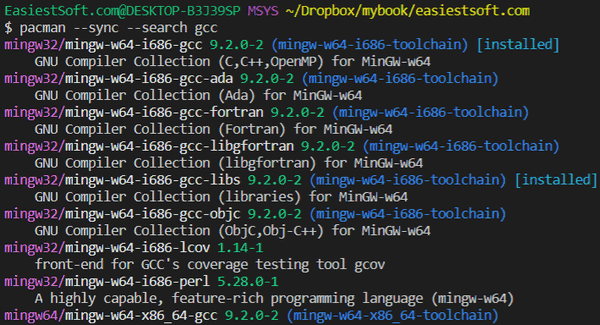
MSYS2 Install MinGW32 or MinGW64
Search for gcc (part of mingw)
$ pacman --sync --search gcc
For installing MinGW32:
$ pacman --sync mingw-w64-i686-gcc
For installing MinGW64:
$ pacman --sync mingw-w64-x86_64-gcc
I (King Eca) have installed MinGW32 because I want to build software that can run on 32-bit Windows systems. Of course you can install both MinGW32 and MinGW64
pacman List installed packages:
$ pacman --query
pacman search an installed package:
$ pacman cd --query --search ssh
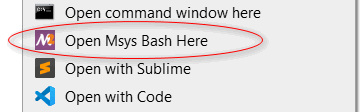
Adding open MSYS Bash here to right-click context menu on Windows
.reg file:
Windows Registry Editor Version 5.00

; Created by: King Eca
; Created on: 2019-12-17
; Tutorial: ; Tutorial: https://easiestsoft.com/win/software-to-run-linux-commands-on-windows/

[HKEY_CLASSES_ROOT\Directory\Background\shell\msys]
@="Open Msys Bash Here"
"Icon"="\"C:\\msys64\\msys2.ico\""

[HKEY_CLASSES_ROOT\Directory\Background\shell\msys\command]
@="C:\\msys64\\msys2_shell.cmd -msys -here -where \"%V/\""

[HKEY_CLASSES_ROOT\Directory\shell\msys]
@="Open Msys Bash Here"
"Icon"="\"C:\\msys64\\msys2.ico\""

[HKEY_CLASSES_ROOT\Directory\shell\msys\command]
@="C:\\msys64\\msys2_shell.cmd -msys -here -where \"%V/\""
-
If you have installed MSYS2 to
c:\msys64like me, you can download Open Msys bash here reg file and... -
Save the .reg file to your desktop
-
Double click/tap on the downloaded .reg file to merge it
-
When prompted, click/tap on
Run,Yes(User Account Control),Yes(Registry Editor), andOK(Registry Editor) to approve the merge -
You can now delete the downloaded .reg file if you like
-
Download Remove Open Msys bash here reg file if you want to remove the right-click context menu
For the meaning of the options -msys, -here and -where, you can check the file C:\msys64\msys2_shell.cmd for details
Make the integrated shell of Visual Studio Code to MSYS2 Bash
I installed Git for Windows before and selected Git Bash as the default shell for VS Code, here is my user settings.json:
{
    "files.autoSave": "afterDelay",
    "files.eol": "\n"
    "terminal.integrated.shell.windows": "C:\\Program Files\\Git\\bin\\bash.exe"
}
Now I uninstalled git for Windows and installed MSYS2, and my settings.json changed to (base on UniformSoup's post and Make the integrated shell of Visual Studio Code to bash of MSYS2 ) :
"terminal.integrated.profiles.windows":
{
    "MSYS":
    {
        "path": "C:/msys64/usr/bin/bash.exe",
        "env":
        {
            "CHERE_INVOKING": "1",
            "MSYSTEM": "MSYS",
            // THE FOLLOWING IS A HACK TO PLACE THE MSYS PATHS BEFORE THE WINDOWS ONES
            "PATH": "/usr/bin;/mingw64/bin;${env:PATH}"
        },
        "color": "terminal.ansiMagenta"
    }
},
"terminal.integrated.defaultProfile.windows": "MSYS",

"terminal.integrated.shellArgs.windows": [
    "--login"
],
"terminal.integrated.cursorStyle": "line",
Available values for MSYSTEM are: MSYS, MINGW32 or MINGW64, you can check the file C:\msys64\msys2_shell.cmd for details
How to set PATH environment for MSYS2
When you start MSYS bash, you are in the ~ directory, what is ~
~ is the a abbreviation of your home directory, we can enter pwd to print current working directory, it should like /home/EasiestSoft.com (Replace EasiestSoft.com with your name)
It seems better to put our files in the ~ directory, because we can quickly switch to it via cd ~/dir
But your home directory in MSYS2 is different from your home in Windows. ~ in MSYS2 is C:\msys64\home\EasiestSoft.com in Windows, and your home directory in Windows 10 is C:\Users\EasiestSoft.com
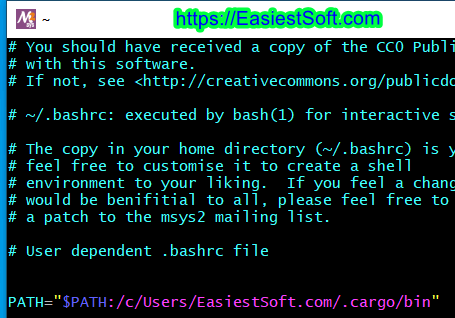
Some Windows software place its binaries in your Windows home directory, for example, the package manager for the Rust programming language places binaries in the C:\Users\EasiestSoft.com\.cargo\bin directory
If we want to call the binaries placed in the C:\Users\EasiestSoft.com\.cargo\bin directory from MSYS2, we need to add C:\Users\EasiestSoft.com\.cargo\bin to the PATH environment of MSYS2
let's print the default PATH of MSYS2:
$ echo $PATH
/usr/local/bin:/usr/bin:/bin:/opt/bin:/c/Windows/System32:/c/Windows:/c/Windows/System32/Wbem:/c/Windows/System32/WindowsPowerShell/v1.0/:/usr/bin/site_perl:/usr/bin/vendor_perl:/usr/bin/core_perl
We add our custom path to ~/.bashrc (Not ~/.profile)
~ $ vim ./.bashrc
Check the result:
~ $ source ./.bashrc
~ $ echo $PATH
/usr/local/bin:/usr/bin:/bin:/opt/bin:/c/Windows/System32:/c/Windows:/c/Windows/System32/Wbem:/c/Windows/System32/WindowsPowerShell/v1.0/:/usr/bin/site_perl:/usr/bin/vendor_perl:/usr/bin/core_perl:/c/Users/EasiestSoft.com/.cargo/bin
Adding MSYS2 binaries to Windows PATH
If you want to call MSYS2 binaries from outside of MSYS2 bash, you need to add them to the Windows PATH environment variable
- Press Windows key on Windows 10
- Enter
envi - Select
Edit the system environment variablesthen pressEnterkey - Click on the
Environment Variablebutton - Double click on the
PathVariable, ClickNew, add values (Fore reference only):- C:\msys64\usr\bin
- C:\msys64\usr\local\bin
- C:\msys64\mingw32\bin
Make links in MSYS2 home directory for quick access
Some software is installed in the C:\Users\EasiestSoft.com directory by default, and we can link them in the MSYS2' s home director for quick access
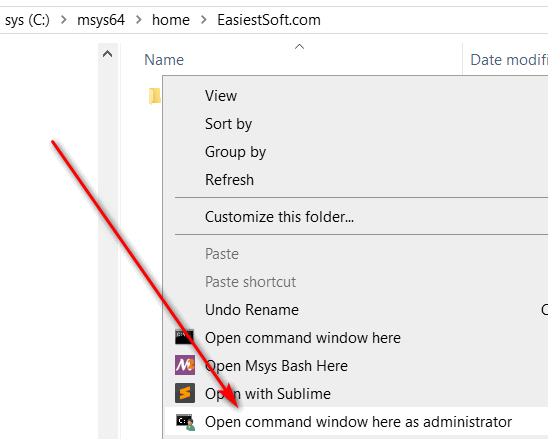
First, Add Shift + Right Click "Open command window here as administrator" Context Menu
Open C:\msys64\home\EasiestSoft.com (Replace EasiestSoft.com with your name) In Explorer, Shift + Right-Click in the folder, select Open command window here as administrator:
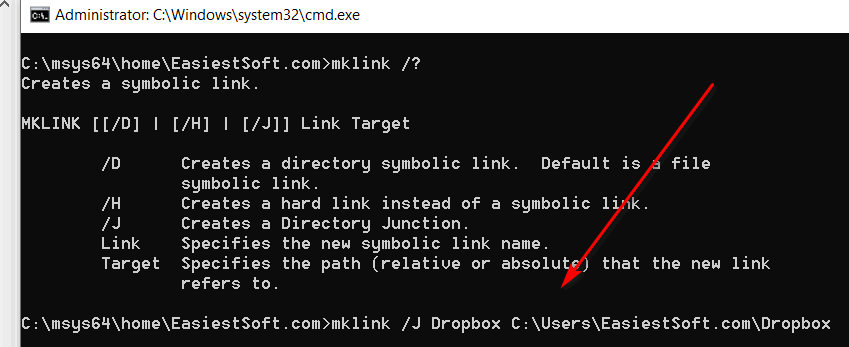
Enter:
mklink /J Dropbox C:\Users\EasiestSoft.com\Dropbox
Now we can:
cd ~/Dropboxto quickly access Dropbox folder- And
start .to open the Dropbox folder from MSYS2 bash in Explorer
Another way is to define a command in ~/.bashrc file, e.g. alias ehc='cd /c/Users/EasiestSoft.com/Dropbox' and then use ehc to change the current directory to Dropbox folder

Note that you can safely delete a directory of the link type, but if you delete a file under that directory, the actual file will also be deleted. Therefor, if MSYS2 is no longer needed, please manually delete the directory of the link type before uninstalling MSYS2 to avoid accidental data loss
Link SSH config files to MSYS2's home directory
Usually we keep important files (for example ssh config file) in the cloud such as OneDrive or Dropbox, and link them to the folders that need them
~ $ mkdir .ssh
cd .ssh

# Open .ssh folder in Windows Explorer
start
Then Shift + right-click in the folder, select Open command window here as administrator
mklink config C:\path\to\your\clould\ssh\config
Enable color for ls command
Search for a line in the ~/.bashrc file containing the world color and uncomment the line by removing the character # at the beginning of the line
Enable Color for pacman
Find #color in /etc/pacman.conf and replace with color
Links:
- https://github.com/valtron/llvm-stuff/wiki/Set-up-Windows-dev-environment-with-MSYS2
- https://dev.to/yumetodo/make-the-integrated-shell-of-visual-studio-code-to-bash-of-msys2-5eao
- https://gist.github.com/magthe/a60293fe395af7245a9e
- https://www.tenforums.com/tutorials/59686-open-command-window-here-administrator-add-windows-10-a.html
- https://www.booleanworld.com/get-unix-linux-environment-windows-msys2/
2019-12-19 King Eca